
Table of Contents
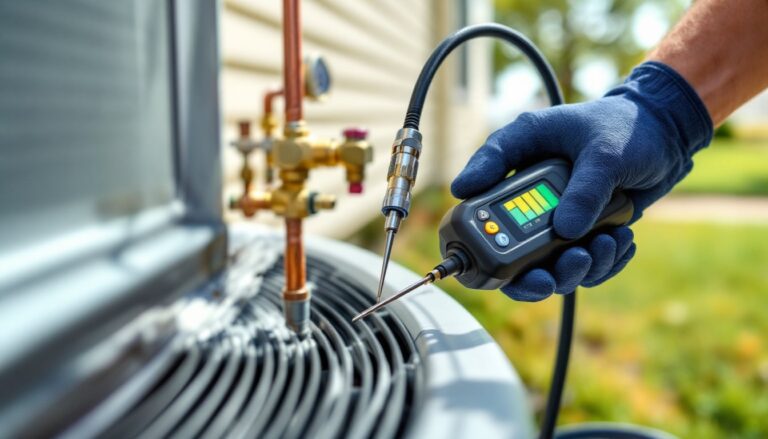
ToggleRefrigerant leaks aren’t just expensive, they’re a red flag for system failure and environmental harm. If your air conditioner’s running non-stop but barely cooling, or you’ve noticed ice buildup on the evaporator coils, you’re likely losing refrigerant. Tracking down leaks used to mean calling an HVAC tech for a costly service visit, but homeowners and DIYers now have access to the same detection tools pros use. The right refrigerant leak detector can pinpoint microscopic leaks in minutes, saving you hundreds in wasted refrigerant and preventing compressor damage before it starts.
Key Takeaways
- A refrigerant leak detector can pinpoint microscopic leaks in minutes, saving hundreds in wasted refrigerant and preventing expensive compressor damage before it develops.
- Electronic leak detectors (heated diode or infrared) are best for residential use and can detect slow leaks down to 0.1 ounces per year, while ultrasonic models excel in noisy environments but require a pressurized system.
- For homeowners doing occasional DIY HVAC work, a mid-range electronic refrigerant leak detector ($100–$200) like the Elitech WJL-6000 offers the best balance of sensitivity, reliability, and affordability.
- The key to successful leak detection is patience and proper technique: warm up the detector, start at valve cores and brazed joints, move slowly, follow the alarm, and always confirm findings with soap bubbles to avoid false positives.
- Federal regulations require repair of substantial refrigerant leaks in systems over 50 pounds, and catching leaks early prevents both environmental harm and compressor overload that spikes energy bills.
Why You Need a Refrigerant Leak Detector for Home HVAC Systems
Refrigerant doesn’t just disappear, it escapes through pinhole leaks in copper tubing, loose fittings, or corroded joints. A system low on refrigerant forces the compressor to work harder, spiking energy bills and shortening equipment life. Many homeowners don’t realize their AC is leaking until it stops cooling entirely, at which point the compressor may be toast.
A leak detector lets you catch problems early. Instead of topping off refrigerant blindly every season, you can locate the exact leak point and seal it properly. This matters because federal regulations under the EPA’s Clean Air Act Section 608 require repair of substantial leaks in systems containing more than 50 pounds of refrigerant. Even smaller residential systems benefit from leak detection, recharging without fixing the leak wastes money and harms the environment.
For DIYers comfortable with basic HVAC maintenance, a leak detector is the difference between guessing and knowing. You’ll know whether that hissing sound near the condenser is refrigerant or just wind, and you can provide your HVAC tech with specific leak locations to cut down on diagnostic time and labor costs.
Types of Refrigerant Leak Detectors: Which One Is Right for You?
Not all leak detectors work the same way. The two main types for residential use are electronic (heated diode or infrared) and ultrasonic. Each has strengths depending on your system, environment, and budget. If you’re exploring the best HVAC leak detector options for home use, understanding these differences will help you choose the right tool.
Electronic Leak Detectors
Electronic detectors sense refrigerant molecules in the air using a heated diode or infrared sensor. When refrigerant passes over the sensor, the tool triggers an audible alarm, flashing LED, or both. Sensitivity is adjustable, typically down to 0.1 ounces per year, sensitive enough to catch slow leaks that won’t show up visually.
Heated diode models (like the Elitech WJL-6000) are affordable and effective for common refrigerants including R-410A, R-134a, and R-22. They work well in still air but can give false positives near solvents, oil vapors, or cigarette smoke. Infrared models are more selective and immune to most contaminants, but they cost significantly more.
Electronic detectors are best for pinpointing leaks at joints, valve cores, and brazed connections. They’re small, battery-powered, and easy to use in tight spaces like attic air handlers or basement furnace rooms. Just keep the probe tip clean and replace sensors annually for accuracy.
Ultrasonic Leak Detectors
Ultrasonic detectors don’t sniff for refrigerant, they listen for the high-frequency sound a pressurized leak makes as gas escapes. Models like the AccuTrak VPE-1000 pick up sounds in the 20-100 kHz range, which humans can’t hear but leak points emit clearly.
These tools excel in noisy environments where electronic detectors struggle. If you’re checking an outdoor condenser next to a busy street or a rooftop unit near HVAC fans, ultrasonic detection cuts through the background din. They also work on any pressurized gas, air, nitrogen, or refrigerant, making them useful for pressure testing lines before charging.
The downside? Ultrasonic detectors require a pressurized system to work. If your system is completely flat, you’ll need to add nitrogen or a trace amount of refrigerant first. They also can’t distinguish between refrigerant and other gas leaks, so confirmation with soap bubbles or an electronic detector is often necessary.
Top Features to Look for in a Refrigerant Leak Detector
Buying a leak detector isn’t just about sensitivity, you need a tool that fits your workflow and environment. Here’s what separates the best from the also-rans.
Sensitivity and adjustability: Look for detectors with sensitivity down to 0.1 oz/year or better. Adjustable sensitivity lets you reduce false alarms in contaminated air or increase precision for tiny leaks. Some models have automatic zeroing, which recalibrates the baseline when you move between areas.
Refrigerant compatibility: Confirm the detector works with the refrigerants in your system. Most modern units use R-410A (Puron), but older systems may have R-22 (Freon) or automotive refrigerants like R-134a. Universal detectors handle CFCs, HCFCs, and HFCs, but check the spec sheet.
Probe length and flexibility: A 16-18 inch flexible gooseneck probe reaches deep into condensers, behind evaporator coils, and around compressor fittings without disassembling components. Rigid probes limit access.
Battery life and power options: Decent tools run 8-12 hours on AA or rechargeable lithium-ion batteries. USB charging is a plus for field use. Avoid detectors that drain batteries in under 4 hours, you’ll spend more time charging than detecting.
Alarm type: Audible alarms with variable pitch (beeping faster as you approach the leak) are easier to follow than visual-only indicators. LED bar graphs help in loud areas where you can’t hear the tone.
Durability and sensor life: Check sensor replacement costs and availability. Some sensors last 1-2 years: others need replacement after 6 months of heavy use. Rubberized housings survive drops better than bare plastic.
For homeowners tackling occasional DIY HVAC work, a mid-range electronic detector ($100-$200) hits the sweet spot. Pros doing daily diagnostics justify ultrasonic models or high-end infrared units, but most residential projects don’t need that firepower.
Best Refrigerant Leak Detectors for Homeowners and DIYers
Here are proven options across price ranges, based on real-world usability and reliability reported in home maintenance guides and user feedback.
Elitech WJL-6000 (around $130): A heated diode detector with 0.14 oz/year sensitivity, 18-inch flexible probe, and simple three-button operation. Handles all common refrigerants and runs 12+ hours on four AA batteries. The auto-zeroing function resets the baseline quickly when moving between zones. It’s sensitive enough for residential systems without being so touchy that it false-alarms on every air current. Good balance of price and performance.
Inficon TEK-Mate (around $300): Infrared sensor technology delivers fewer false positives and longer sensor life (up to 3 years). The tri-color LED and variable tone make it easy to zero in on leaks even in dim crawl spaces. It’s overkill for one-time repairs, but if you maintain multiple rental properties or help friends with HVAC issues, the durability and accuracy pay off.
Fieldpiece SRL8 (around $250): A heated diode model with a unique filter cap that blocks oil and moisture, reducing sensor contamination. The 14-inch probe isn’t the longest, but the ergonomic grip and bright LED display work well in cramped mechanical rooms. Fieldpiece’s customer support is solid, and replacement sensors are readily available.
AccuTrak VPE-1000 (around $350): The best ultrasonic option for noisy environments. Comes with noise-canceling headphones and a sensitivity dial for fine-tuning. It’s not limited to refrigerant, use it to find air leaks in ductwork or pneumatic line leaks in shop tools. The learning curve is steeper than electronic detectors, but it’s unbeatable in outdoor or industrial settings.
If you’re budget-conscious and only need leak detection once or twice, consider renting from a local tool rental shop or a home improvement platform that connects you with contractor resources. Rental rates run $20-$40 per day, which beats buying a $300 tool you’ll use twice.
How to Use a Refrigerant Leak Detector: Step-by-Step Guide
Leak detection is straightforward, but prep work and patience make the difference between finding the leak and wasting an afternoon.
Safety first: Wear safety goggles and nitrile gloves. Refrigerant isn’t acutely toxic, but contact with liquid refrigerant causes frostbite, and prolonged exposure to high concentrations in enclosed spaces can displace oxygen. Work in ventilated areas. If you’re checking an indoor air handler in a closet, open doors and windows.
Step 1: Confirm the system is charged and running. Leak detectors need refrigerant vapor to detect. If your system is completely empty, you’ll need to add a trace charge or pressurize with dry nitrogen (the latter is better for initial pressure testing but requires a manifold gauge set and nitrogen tank, consider calling a tech if you’re not equipped).
Step 2: Power on the detector and let it warm up. Electronic detectors need 3-5 minutes to stabilize. Place the probe in clean air away from the HVAC system and let it auto-zero. Don’t skip this, starting detection before the sensor stabilizes floods you with false alarms.
Step 3: Start at the most likely leak points. Check valve cores (Schrader valves on the service ports), flare fittings, brazed joints, and the evaporator coil drain pan first. Move the probe slowly, about one inch per second, around each joint. Rushing past a leak gives you nothing.
Step 4: Follow the alarm. As the detector senses refrigerant, the beep rate or LED intensity increases. When you’re right on the leak, the alarm goes continuous or maxes out. Mark the spot with chalk or a paint pen.
Step 5: Confirm with soap bubbles. Spray a leak detection solution (or diluted dish soap) on the suspected area. Bubbles confirm the leak. This step prevents false positives from contamination or airflow.
Step 6: Document and repair. Take a photo, note the location (e.g., “discharge line elbow, 6 inches from compressor”), and decide if you’re fixing it yourself or calling a pro. Small leaks at flare fittings can often be tightened with a wrench. Pinhole leaks in copper tubing require brazing, which needs a torch, filler rod, nitrogen purge, and recovery equipment, unless you’re a confident solderer, that’s a job for a licensed HVAC tech.
Common mistakes: Don’t wave the probe around like a metal detector. Slow, methodical sweeps catch leaks. Don’t check immediately after adding refrigerant, let the system run for 10-15 minutes so pressure stabilizes. And don’t ignore small leaks thinking they’re insignificant. A 0.5 oz/year leak becomes a pound over two years, and it only gets worse.
If you find multiple leaks or detect refrigerant but can’t isolate the source, the evaporator coil may be corroded internally. That’s a major repair requiring coil replacement or a full system swap, and it’s time to get quotes from pros.