Table of Contents
ToggleSmart boards aren’t just for classrooms anymore. These interactive displays, combining touchscreen technology, digital whiteboard capabilities, and wireless connectivity, are finding their way into homes across the country. Whether you’re managing a home office, coordinating family schedules, or creating a learning space for kids, a smart board offers hands-free convenience and visual clarity that a traditional bulletin board or tablet can’t match. Installation ranges from simple plug-and-play models to wall-mounted units that require basic carpentry and electrical planning.
Key Takeaways
- A smart board for home consolidates whiteboards, calendars, and video call setups into one interactive display that syncs with smartphones and cloud storage for family organization and remote work.
- Smart boards use capacitive or infrared touch technology to detect input from multiple users simultaneously, supporting everything from scheduling to real-time collaboration without emailing files back and forth.
- Proper installation requires mounting to wall studs with lag screws, ensuring an electrical outlet is within 6 feet, and positioning the screen center at eye level to avoid discomfort and incorrect usage.
- Budget $400–$800 for entry-level models, $800–$2,000 for mid-range units with 4K resolution, or $2,000+ for premium boards, with sizes ranging from 32 to 86 inches depending on room layout and viewing distance.
- A smart board can function as a smart home control hub for lights, thermostats, and security cameras while serving as a second monitor for professionals or an educational tool for homeschooling families.
What Is a Smart Board and How Does It Work?
A smart board is an interactive flat-panel display that responds to touch, stylus input, or gestures, much like an oversized tablet mounted on a wall or stand. Most models use capacitive or infrared touch technology to detect input, allowing multiple users to write, draw, or manipulate content simultaneously.
At its core, a smart board runs on an embedded operating system, usually Android, Windows, or a proprietary platform, that supports apps, web browsers, and cloud connectivity. Some units function as standalone devices with built-in processors and storage, while others act as external displays that connect to a computer, smartphone, or tablet via HDMI, USB-C, or wireless protocols like Miracast or AirPlay.
The display itself is typically an LED-backlit LCD or OLED panel ranging from 32 inches to 86 inches diagonally. Resolution matters: look for at least 1080p (Full HD) for clear text and images, or 4K (Ultra HD) if you’re using it for detailed design work or presentations. Refresh rates of 60 Hz or higher reduce lag during writing or drawing.
Most smart boards include built-in speakers and microphones for video conferencing, plus USB ports and card readers for peripheral devices. Higher-end models offer anti-glare coatings to reduce reflections from windows or overhead lights, a worthwhile upgrade if the board will be mounted near a south-facing window.
Key Benefits of Installing a Smart Board in Your Home
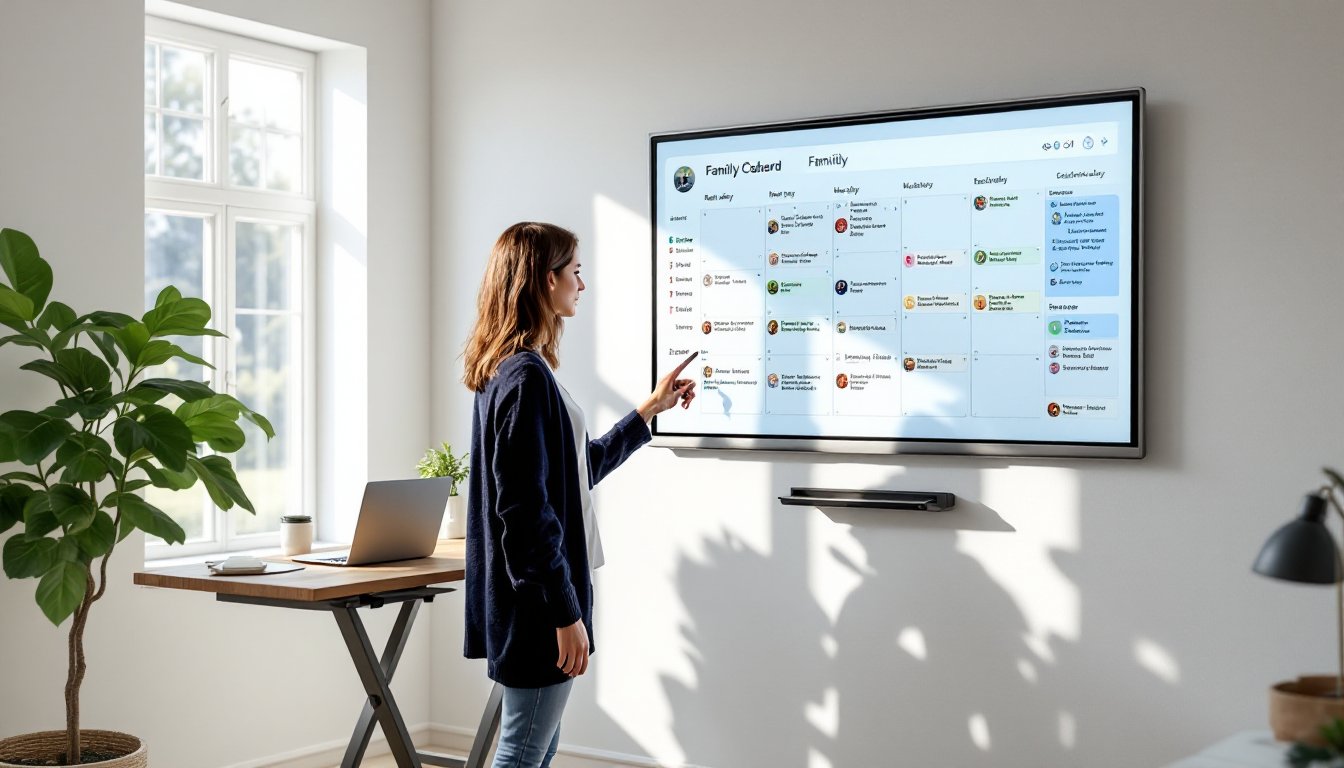
The biggest advantage is consolidation: one device replaces whiteboards, calendars, photo frames, and video call setups. For families juggling schedules, meal plans, and to-do lists, a smart board serves as a digital command center that syncs with smartphones and cloud calendars.
Interactive features make collaboration easier. Multiple users can annotate documents, brainstorm on a shared canvas, or markup floor plans during a renovation discussion, all without emailing files back and forth. Many models auto-save changes to cloud storage like Google Drive, Dropbox, or OneDrive, so nothing gets lost when you wipe the screen.
For remote workers, a smart board doubles as a second monitor or presentation display. It’s especially useful for video calls, where screen sharing and real-time annotation help clarify ideas faster than talking over a static slide deck. According to reviews on Digital Trends, interactive displays reduce meeting time by improving visual communication.
Education is another strong use case. Parents homeschooling or helping with assignments appreciate the ability to pull up educational apps, annotate PDFs, or watch instructional videos on a large screen. Stylus input mimics pen-and-paper work, which is helpful for math or handwriting practice.
Finally, smart boards can streamline smart home automation by serving as a control hub for lights, thermostats, security cameras, and door locks. Instead of juggling multiple apps, you can manage everything from one touchscreen interface.
Popular Use Cases for Home Smart Boards
Home Office and Remote Work
A smart board transforms a spare bedroom or basement into a professional workspace. Mount it at standing desk height (42-48 inches to the center of the screen) for video calls and presentations, or lower if you’ll primarily use it while seated.
For freelancers and consultants, the board acts as a client-facing collaboration tool. Architects can markup blueprints, graphic designers can walk clients through mockups, and tutors can work through problems in real time. The ability to record sessions or export annotated files adds value that a webcam and laptop alone can’t provide.
Pair the board with a wireless keyboard and mouse to switch between apps quickly. If you’re connecting to a PC or Mac, a USB-C cable handles both video and data transfer with a single connection. For wireless setups, invest in a dual-band Wi-Fi router (802.11ac or Wi-Fi 6) to prevent lag during screen mirroring.
Safety note: Wall-mounted boards over 50 pounds require studs or heavy-duty wall anchors rated for the load. Use a stud finder to locate 16-inch on-center framing, and install the mounting bracket with 3-inch lag screws into solid wood, not just drywall. If mounting on metal studs, use toggle bolts rated for at least 100 pounds.
Family Organization and Planning
In kitchens, mudrooms, or hallways, a smart board becomes a shared family hub. Display a synced calendar that pulls events from everyone’s phones, post grocery lists that update in real time, or pin meal plans with embedded recipe links.
Some families use the board as a chore tracker with gamified progress bars for kids, or as a message board where handwritten notes get auto-converted to text and texted to absent family members. Cloud-based whiteboard apps like Microsoft Whiteboard, Miro, or Google Jamboard support these workflows.
For households managing aging relatives, smart boards can display medication schedules, video call shortcuts, or emergency contact information in large, readable fonts. Pairing the board with devices designed for seniors creates a more accessible tech ecosystem.
Electrical consideration: If installing in a kitchen or bathroom, ensure the outlet is GFCI-protected per NEC Article 210.8. Keep the board at least 3 feet from sinks or stovetops to avoid moisture and heat damage.
Choosing the Right Smart Board for Your Space
Start by measuring the wall or space where the board will go. A 55-65 inch display works well for home offices and small rooms, while 75-86 inches suits open-concept areas or multipurpose rooms. Viewing distance matters: for comfortable reading, sit no closer than 1.5 times the screen’s diagonal measurement (a 65-inch board needs at least 8 feet of clearance).
Decide between portable and wall-mounted. Portable units on rolling stands (often with locking casters) offer flexibility but take up floor space. Wall-mounted boards save space and look cleaner but require drilling into studs. If you rent, a portable model avoids lease conflicts.
Check the operating system and app ecosystem. Android-based boards offer access to the Google Play Store, which is useful for streaming, productivity apps, and games. Windows-based models integrate seamlessly with Microsoft Office and Teams. Proprietary systems may limit app choices but often include optimized whiteboard and video call software.
Connectivity options vary widely. Look for HDMI 2.0 or higher, USB 3.0 ports, Bluetooth 5.0, and dual-band Wi-Fi. If you plan to connect legacy devices (older laptops, document cameras), verify compatibility with VGA or DisplayPort adapters.
Budget $400-$800 for entry-level models (32-43 inches, 1080p, basic touch), $800-$2,000 for mid-range units (55-65 inches, 4K, robust app support), and $2,000+ for premium boards (75+ inches, advanced multitouch, anti-glare, built-in cameras). Prices fluctuate with panel shortages and shipping costs, so compare across multiple retailers.
Read recent reviews on Tom’s Guide or CNET to check for issues like touchscreen drift, software bugs, or poor customer support. Warranty length matters, look for at least 2 years on parts and 1 year on labor.
Installation Tips and Setup Considerations
Pre-installation checklist:
- Locate wall studs using a stud finder. Mark center points with painter’s tape.
- Confirm the mounting bracket fits your board model (they’re not universal).
- Ensure an electrical outlet is within 6 feet of the installation site. Avoid running extension cords: if needed, hire a licensed electrician to add an outlet per NEC guidelines.
- Clear the wall area of artwork, shelves, or obstructions.
Step-by-step wall mounting:
- Hold the mounting bracket against the wall at the desired height. Use a 4-foot level to ensure it’s perfectly horizontal. Mark screw holes with a pencil.
- Drill pilot holes into studs using a 3/16-inch bit for wood studs or the appropriate bit for metal studs. Pilot holes prevent splitting and make driving screws easier.
- Attach the bracket with lag screws. For wood studs, use 3-inch x 1/4-inch lag screws. For metal studs, use toggle bolts rated for the board’s weight plus 50%.
- Hang the board on the bracket following the manufacturer’s instructions. Most use a hook-and-rail system or quick-release clips. Have a second person support the board’s weight during installation.
- Level the board after hanging. Some brackets allow micro-adjustments via set screws.
- Run cables through the wall (optional but recommended) for a clean look. Use an in-wall cable management kit rated for low-voltage wiring. If running power, hire an electrician, most codes require Romex cable and junction boxes for in-wall AC power, not standard power cords.
Post-installation setup:
- Power on the board and complete the initial software setup (language, Wi-Fi, account login).
- Install any required apps or updates. This can take 15-30 minutes on first boot.
- Calibrate the touchscreen using the built-in calibration tool. This ensures accurate stylus and finger input.
- Connect peripherals (keyboard, mouse, webcam) and test functionality.
- Adjust brightness and sound levels for your room’s lighting and acoustics.
Common mistakes to avoid:
- Mounting too high. The center of the screen should be at eye level when seated or standing, depending on primary use.
- Ignoring cable management. Loose cables look messy and create trip hazards.
- Skipping the pilot holes. Driving screws directly into studs can split wood or strip threads.
- Using drywall anchors alone for heavy boards. Always anchor to studs for loads over 30 pounds.
PPE and tools: Wear safety glasses when drilling overhead. Use a cordless drill with adjustable torque to avoid overtightening screws. A stud finder, level, tape measure, and pencil round out the essential tools.
For more context on integrating other connected home technology, consider how the smart board fits into a broader automation strategy. Centralized control interfaces reduce the learning curve for non-tech-savvy household members and streamline daily routines.